How to start
Never stitched before? No problem. Our tiny patterns are made for beginners — most take just an evening or two.
 1
Gather your supplies
Tiny patterns need very little. You can find everything at a craft shop for a few euros.
- 14-count Aida fabric — about 10 × 10 cm is plenty for a tiny design.
- Embroidery floss in the colours listed on the pattern (e.g. DMC).
- A blunt tapestry needle, size 24 or 26.
- Small sharp scissors, and a small hoop if you like (optional).
 2
Find the centre
Fold your fabric in half, then in half again. Where the creases meet is the centre.
- The middle of the chart is marked by the arrows or bold lines.
- Starting from the centre keeps the design nicely placed on your fabric.
- 3
Thread up and stitch the first line /
Floss comes as 6 strands. Gently pull 2 strands apart and cut a piece about the length of your forearm. Thread your needle — no knot needed.
- Come up from the back at the bottom-left corner of a square.
- Go down at the top-right corner. That's your first line: /.
- Leave a short tail at the back and catch it under your first few stitches to secure it.
- Working several squares of the same colour? Stitch all the / lines first, one after another.
- 4
Cross back with the second line \
Now cross over each / to turn it into an X.
- Come up at the bottom-right corner of the square.
- Go down at the top-left corner. That's the second line: \ — and now you have an X!
- Always make the top line go the same direction (\ on top). It makes your stitching look smooth and even.
 5
Work by row or by column
You don't have to finish each X one at a time. Most stitchers work in lines — it's faster and uses less thread.
- By row: stitch a row of / going left to right, then come back right to left with the \ lines.
- By column: for tall, narrow shapes (like a tulip stem), go down the column with / and back up with \.
- One at a time: for single, scattered stitches (like ladybug spots), finish each X fully before moving on.
- Whichever you choose, keep the top line the same direction everywhere.
 6
Read the chart
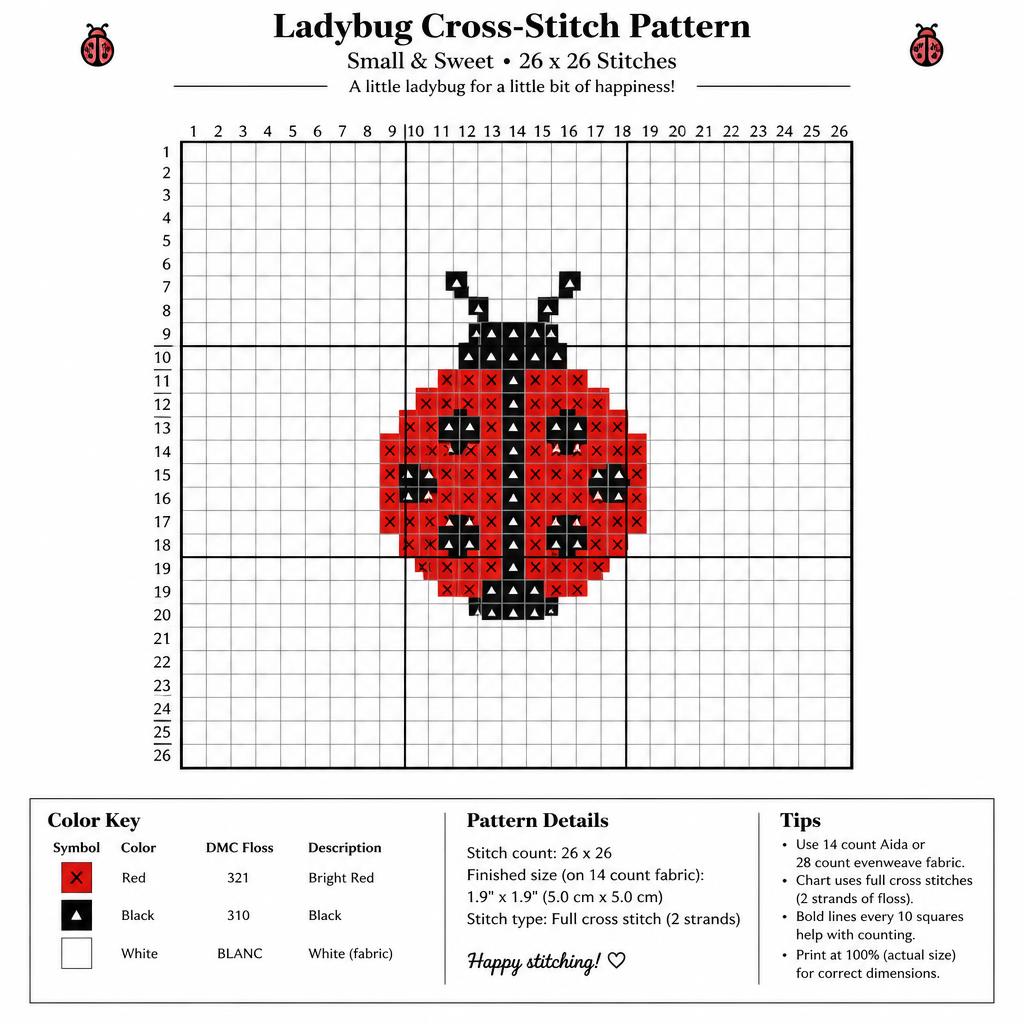
Each square on the chart is one X on your fabric. The symbol or colour tells you which thread to use.
- Check the colour key to match symbols with thread numbers.
- Bold lines every 10 squares help you count — count twice, stitch once.
- Stitch one colour area at a time, then move on to the next.
 7
Finish and enjoy
When a thread runs out or a colour is done, weave the end under a few stitches on the back and snip.
- Hand-wash gently and press face-down on a towel if needed.
- Display it in a mini hoop, frame it, or sew it onto a card as a gift.
Ready for your first stitch?
The Ladybug uses just two colours — a perfect first project.
Find your first pattern